
http://teacherchallenge.edublogs.org/2013/08/13/step-1-set-up-your-class-blog/#settings
Step 1: Set up your class blog
Welcome to our latest free professional learning series on class and student blogging!
This series guides you step by step through the process of class and student blogging. It provides class blog examples so you can check out how they are used by educators. Many of the examples are from primary grades but the same principles apply regardless of student age (including adult learners).
Refer our personal blogging series if you want to set up a personal or professional educator’s blog.
The activities can be completed at your own pace and in any order!
Wherever you’re at – we’ll step you through the tasks designed to increase your skills while providing help to support your learning. Don’t stress, have fun, and remember to ask for help by leaving a comment any time you need assistance!
The aim of this first activity is to:
- Help you learn more about what is a blog and why educators use blogs.
- Help you set up your class blog, customize your settings and change your theme.
Click on a link below to go to the section you want to work on:
- What is a blog?
- Why educators use blogs
- Examples of class blogs
- Sign up for your class blog
- Create your class blog (if you don’t already have one!)
- Update your Profile
- Upload your user avatar
- Check your General settings
- Customize your blog theme
- Commonly asked theme questions
- What else did you want to know?
WHAT IS A BLOG?
One of the biggest challenges educators new to blogging face is understanding the basics of how a blog works.
So we made this quick intro video to explain.
We recommend you start by watching this video.
We’ve included explanations of key blogging vocabulary which will help as you work through this series including Footers, Headers, Menus, Pages, Posts, Comments, Sidebars, Theme and Widgets.
You can check it out on MediaCore here if you don’t have access to YouTube.
Feel free to share this video on your own blogs, with students or teachers, or with whomever you think may enjoy! Later in this series we show you how easy it is to add videos to your blog.
You’ll find an activity on blogging vocabulary you can use with your students here!
Back to Top
WHY EDUCATORS USE BLOGS
The main reasons why educators use blogs include:
- Share information and class news with parents, family and caregivers.
- Provide students with a way to access assignments, homework, resources and information about their class online.
- For global collaboration and authentic audience.
- To inspire and motivate students.
The benefits of class blogging include:
- Blogging opens up the possibilities of audience in new ways. When students are writing or publishing for an audience other the teacher, it impacts how they view what they are doing and the intrinsic motivation they have.
- Students love seeing their work on the Internet and adore getting comments from people. It motivates them to write as it gives them an audience that is real. The blog opens up a whole new world of people who can offer encouragement and feedback.
- The blogging experience forces the students to do more reflection on their learning and allows them to showcase products they have produced with online tools.
- Blogging provides an authentic educational experience, where what they write is not only seen and commented on by their teacher, but by their peers and the “public.” For most students, it’s a bit of extra motivation knowing their peers will see their work.
- There is an authentic audience – a global audience – one that is willing to connect, share, challenge, discuss and communicate with classes. This audience can provide further information, opinions, suggest resources, seek answers to questions and so on which pushes blogging further.
- Blogging develops a learning network. Exercise books etc need not be pushed and crumpled in school lockers only to be placed in the rubbish bins at the end of the school year, but student work is out there for their school lives.
Benefits from class blogging summarized from The State of Educational blogging in 2013.
Back to Top
EXAMPLES OF CLASS BLOGS
Your class blog is what extends your class beyond the four walls of your classroom. As you get going, you’ll soon decide the kinds of content, information and connections you want to make.
Here are examples of real class blogs to check out for ideas:
- 1A/B @ Willunga Primary – Kindergarten
- Discovery Den – Pre Primary
- Mrs. W. and P-1-2 @ Harston Primary – Pre Primary to Grade 2
- The Birds Nest – Kindergarten / Grade 1
- Patterson’s Pack – Grade 1
- Mrs K’s Class – Grade 1
- Year 1 @ Craigburn PS – Grade 1
- Look What’s Happening in Room 102! – Grade 1/2
- Ms Cassidy’s Classroom blog – Grade 2 (links to student blogs in sidebar)
- Mr Salsich’s Class – Grade 3
- Mrs Yollis’ Classroom blog – Grade 3
- Mrs. Hamman’s Class Blog – Grade 3
- Mr Baldock’s Class blog – Grade 3/4
- Grade 3/4 at Napoleons Primary School – Grade 3/4
- Jade J Year 3/4 Multiage – Grade 3/4
- 4KJ @ Leopold Primary School – Grade 4
- The Skinny – Grade 5
- Grade 5 at Napoleons Primary School – Grade 5
- Learning2gether – Grade 5
- Mr. Miller’s Classroom Blog – Grade 6
- Huzzah – Grade 6/7
- Krebs’ Class Blogs – Grade 7/8
- The Edublogger class blog list – includes Maths, Science, English, History, LOTE, EFL /ESL, Library, School news blogs and more!
We are also regularly adding new blogs to our Pinterest Examples of Class Blog board.
SIGN UP FOR YOUR CLASS BLOG
Your first step if you don’t currently have your own blog, or you would like to use a new blog for this challenge, is to sign up for a blog.
You can use any blogging platform you would like including Edublogs, WordPress and Blogger, however when we write detailed instructions they will refer to Edublogs. You will be able to adapt this information to the blogging platform you are using.
Here are some important things to consider before creating your blog:
Back to Top
1. Your Username
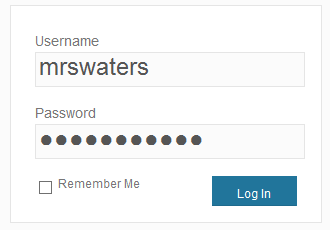
Your username is what you use to sign into your blog dashboard and is displayed on posts and comments you write.
While you can’t change your username, most blog platforms do allow you to change how your name is displayed on posts and comments.
Most teachers don’t allow students to use first and last name online and it is common for them to model this by using display names like Miss W or Mrs. Waters.
Back to Top
2. Blog URL (Domain)
During the creation of your blog you have to select a URL for it. When you want others to visit your blog you give them the URL link of your blog. For example, the URL for the Teacher Challenge blog is http://teacherchallenge.edublogs.org/
Think carefully about your blog URL.
Once your blog has an established audience you’re less likely to want to change your blog URL. Ideally you want to keep your blog URL short, easy to remember and we recommend you use a URL that you can reuse for several years.
For example, blog URLs that include your class room number or the year mean that you’re less likely to use the same blog URL again next year. Most educators re-use their class blog each year because:
- It saves time and is easier.
- Provides a record of previous years’ work to share with students and/or a resource the teacher can refer to.
A simple option is to use your name in the blog URL as these educators did:
- Mr. Baldock’s Class blog (http://mrbaldock.edublogs.org)
- Mr. Salsich’s Class blog (http://jmsalsich.edublogs.org/)
Alternatively, use something unique that has meaning like:
Back to Top
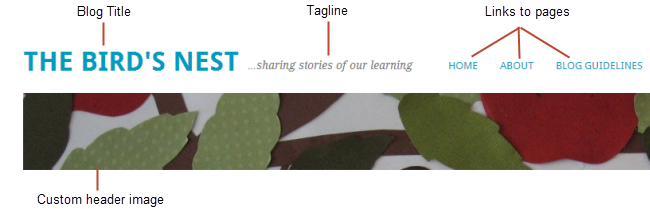
3. Blog Title
Your blog title is one of the first things a reader sees when visiting your blog. Choose a name that reflects the purpose of your class blog and your students can relate to.
But don’t stress too much! You can always change your blog title any time via Settings > General in your dashboard.
Some teachers organize a class activity so students can help choose the blog title.
Check out the following blog lists for ideas of blog titles other educators have used:
- The Edublogger class blog list
- Best Class Edublog 2012
4. Password
Passwords are our line of defense for protecting our online accounts.
The stronger your password the more protected your accounts are. You should always use strong passwords for all accounts and use strong passwords that are different for each of your important accounts.
While remembering multiple strong passwords can be annoying, at least all your other accounts are protected even if a password is compromised for one account.
A strong password:
- Is at least 8 characters long
- Is unique and different from your other passwords.
- Doesn’t include terms that are significant to you like pet’s name, username, real name, date, phone number that are easy to guess or use complete words that make it easier for hackers who use dictionary attack programs. Also avoid common word misspellings and words in which letters have been replaced by numbers or symbols because some dictionary attack programs also check for these.
- Contains a combination of uppercase and lower case letters, numbers and symbols (keyboard characters that aren’t letters or numbers).
A common method used for creating a strong random password is to turn a sentence that you can easily remember into a password by using the first letter of each word, parts of words, substituting numbers and symbols as appropriate. Choose phrases that are meaningful to you or includes your favourite hobby or sport to help you remember.
For example, my phrase might be:
Rush Hour 3 is my favorite movie might become rH/3iMfm
or
I love football could become iLuVfb
You’ll find more tips for creating strong passwords here.
Back to Top
CREATE YOUR BLOG
Now you’ve done all the research it’s time to create your blog! All you need to do is follow these instructions if you would like to set up your blog on Edublogs.
Alternately, check out The State of Educational Blogging 2013 to read more about the different blog platforms used by educators.
Back to Top
UPDATE YOUR PROFILE
Your Profile page is where you can control the global settings for your username including where you set up your display name, change your password and email address.
It’s worth spending time quickly learning how to update your profile so you’ll be able to explain the steps to your students.
Your Profile is most commonly used to update display name, password and email address so we’ll focus on this. You’ll notice there are lots of personal settings options in Your Profile and you can read more about each personal setting here.
Here’s how to update your Profile:
1. Log into your blog dashboard.
2. Go to Users > Your Profile in your blog dashboard.
The menu item displayed is controlled by your user role. You will see Users > Your Profile but if your students are assigned a role with a lower access they might see Profile > Your Profile. We’ll be discussing user roles later in this series.

3. Scroll to near the bottom of the page to Nickname in the Name area.
4. Change the Nickname to the name you want displayed on posts and comments.
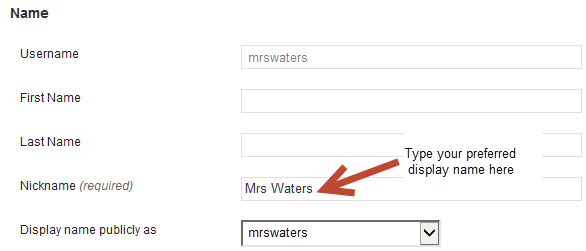
5. Click on the drop down arrow and select your preferred publicly displayed name.

6. Now look at the email under Contact info. All comment notification and password reset emails are sent to this address.
If you’ve set up your blog using our no email option it will look like this:

If you would like to receive comment notifications and be able to retrieve your password using the Lost Password link then we recommend you add your email address.
Please note:
Your email address is required. You may change this, but you can only use one e-mail address per username. This email address must be valid because to confirm that change an email will be sent to this address and it won’t be changed until you click on the link in the email.

7. Now scroll to the bottom of the page and you’ll see the new password field.
Change your password by typing your new password into both boxes. There is no need to update your password (unless you want to). We just wanted to show you how it is done.
- Using a combination of letters, numbers and symbols makes it hard for others to guess your password.
- The strength indicator provides an indication of how good your password choice is!
- Read more about creating strong passwords here.

8. Now just click on Update Profile to apply the changes.
Remember to always click on Update Profile whenever you make any changes on Your Profile page!
Back to Top
UPLOAD YOUR USER AVATAR
Your avatar is an online representation of you.
The user avatar is also known as your comment avatar. You upload the user avatar via Users > Your Avatar and it displays in places where you leave comments and next to posts you publish on some themes.
The default avatar set in Settings > Discussions is automatically display next to comments you leave unless you upload your own Avatar. Most teachers like to show they students how to set up their user avatar because it allows the student to personalize their image.
Below is an example of a user avatar next to a comment.
![]()
There are a few tricks to setting up your user avatar so it’s worth setting it up now so you can demonstrate to your students later and will know what to do if they have any issues.
Uploading your avatar is as simple as:
1. Select a photo or create your avatar using an online tool.
Many schools don’t allow students to use photos of themselves on blogs so teacher often get their students to create avatars that is representative of them. You’ll find a list of online tools and ideas for creating avatars here.
2. Resize your image to 200 pixels wide by 200 pixels high.
![]()
3. Go to Users > Your Avatar.
![]()
4. Click on Browse and locate the avatar you want to upload.
5. Click on Upload.
![]()
6. Move the crop area to one corner, then expand the crop area to include your full image and click Crop image.
![]()
7. Now when you view a post where you’ve left a comment you will see your new comment avatar.
Important tips:
- If you change your avatar and still see the old avatar it may be your web browser remembering your old image.
- Hold the Ctrl key and press F5 to clear your browser cache.
CHECK YOUR SETTINGS
The General Settings is where you configure the broad settings of your blog including your blog title, tagline, blog admin email address, timezone.
The most important setting to update in General Settings is your timezone. Educators often assume that blogs are automatically created set to their timezone and weeks later wonder why the post and comments date and times are weird.
The other important thing to consider is the blog admin email address. This email address is where all comment moderation emails are sent; and is used for payment receipts (if you are anEdublogs Pro subscriber). If you would like to receive comment moderation emails then we recommend you add your email address.
You’ll find more information on the configurations options in General Settings here.
Here’s how to change your timezone:
1. Go to Settings > General.

2. Select your timezone from the drop down menu option.
![]()
3. Click Save Changes.
CUSTOMIZE YOUR BLOG THEME
Your theme is what controls the look and appearance of your blog; this is what people see when they visit your blog.
This is how you give your class blog its personal touch.
Like most things in life, first impressions count.
Great blog themes make good impressions on readers so that visitors are more likely to check out your blog. Overwhelming themes detract from your blog content, and make visitors less likely to read your content.
Every newly created blog normally has the same default theme. The last thing you want is to look like all the other blogs.
Customizing your blog theme is normally one of the first thing most people want to do when they first log into their blog.
So lets finish off getting your class blog started by showing you how to customize your theme!
Back to Top
MOBILE FRIENDLY THEMES
But first lets talk theme choices!
There are lots of themes you can choose from. Your best option if you want your blog to display nicely on all devices including phones, tablets and desktops, is to use a mobile-ready theme.
The mobile-ready themes, also known as responsive themes, are designed to optimize the theme based on which device some one is using to view your blog. If you view a non-responsive theme on most modern phones it will automatically zoom out so that your entire blog can be seen. This means your readers need to zoom in to read your content.
Here’s what my personal blog, which uses Yoko – a responsive theme, looks like when viewed on an iPhone, iPad and desktop.

You’ll find a complete list of Edublogs mobile friendly themes here!
Back to Top
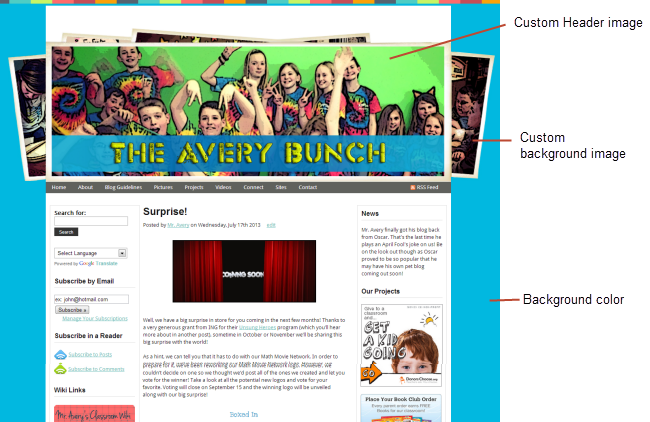
EXAMPLES OF THEMES CUSTOMIZATION ON CLASS BLOGS
Below’s screenshots of class blogs using the popular themes, with explanations of how the teacher has customized the theme, to inspire you!
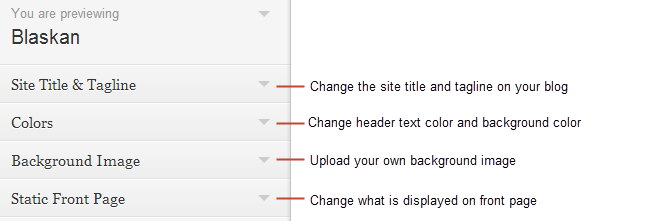
Blaskan

Blaskan
Magazino

Magazino
Mystique

Mystique
WPMU-Dixi
Dixi
Yoko

Yoko
USING THE THEME CUSTOMIZER
Ready to change your theme?
Great! It’s really easy. Using the theme customizer you can customize your theme and see the results in real time before activating the theme.
Here’s how to change your theme using the theme customizer:

2. Click on ‘Live Preview‘ below the theme you want to use.

Or if you want to customize your current theme, click on ‘Customize‘ under the current theme.

3. This loads the theme customizer. Now all you do is work through the control panels on the left to customize the theme to preview the theme changes in real time before activating it on your blog.
4. Once you’re happy with the changes you just click ‘Save and Activate’.

Below’s a quick summary of each customizer control panel:
We recommend you leave the static front page set to ‘Latest Posts’. Most class blogs use a blog post page for their homepage and we’ll explain why you might use a static page in our next post.
You’ll find more detailed information on using the theme customizer here.
Back to Top
Uploading your own custom header image.
Almost all Edublogs themes include an option to upload your own custom image header.
A custom image header means you can obtain a much more customized look and feel adding your “own personal touch” to your blog.
For best results we recommend you upload your custom header image using Appearance > Header rather than using the theme customizer.
Uploading your own custom header image is as simple as:
1. Go to Appearance > Header in your dashboard.

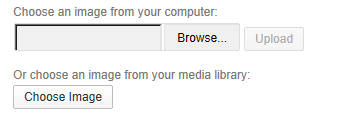
2. Click on Browse, select the image on your computer and then click on Upload.
Or click on Choose image, if you want to select an image from your media library, select the image and then click Set as Header.
3. Your image will upload and if it isn’t the exact dimensions you’ll need to select the area you want to crop and then click Crop and Publish.

5. Your new header image is displayed in the Preview box at the top of the page so you have an idea of what the header image looks like on your blog.
It should also appear immediately on your blog. However if it doesn’t try clearing your web browser cache by holding the Ctrl key and pressing F5.
You’ll find more detailed information on using your own custom header image here!
Back to Top
UPLOADING YOUR OWN BACKGROUND IMAGE
On many themes, much like custom header images, you can add images to your blog’s background. A background image is another great way of adding that personal touch to your class blog.
The easiest way to upload a custom background image is to use Appearance > Background or select one of the preset backgrounds in Appearance > Preset Backgroundsrather than using the theme customizer.
Uploading your own custom background image is as simple as:
1. Go to Appearance > Background.
- Themes that don’t support the custom background images won’t have the Background menu item under Appearance.
- The preview box shows the current background image or selected background color. If the box is blank it means you have not set a background image or color.

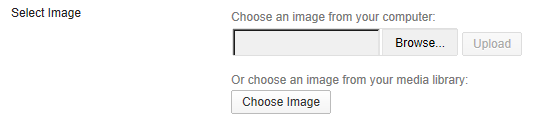
2. Click on Choose file, browse for the image on your computer and then click on Upload
Or click on Choose image, if you want to select an image from your media library, select the image and then click Set as Background.
- Only .jpeg, .gif, and .png files can be used for image headers.
3. Once uploaded or selected from your media library choose your background image display options and then click Save Changes.
- For best results we recommend you use Tile and Scroll.
4. You can remove the background image at any time by clicking on Remove Background image.
You’ll find more detailed information on using your own custom background image here!
COMMON QUESTIONS WE’RE ASKED ABOUT THEMES
Here’s answers to commonly asked theme questions we receive into Edublogs Support:
1. Can I upload my own theme?
Because of the way blog platforms like Edublogs, WordPress.com and Blogger work you can only use the themes provided and can’t upload your own custom themes. Most themes are designed to work on single installs and many don’t work or can have compatibility issues on blog platforms.
Remember that custom image headers and backgrounds are a very effective way of customising your theme to meet your needs.
2. How do I change the font color, font size and text color?
Some themes have extensive theme customization options which aren’t supported by the theme customizer. Examples of these types of themes include WPMU-Triden, WPMU-Dixi, Mystique, Yoko, Mandigo and Edublogs Default 2011.
They often include options to change font color, font size and text color.
These types of themes add a theme option menu item under Appearance once the theme is activated. To do more extensive customization you just need to go to Appearance > Theme Options.

You can also change font type, size and color in posts or on pages using the Supreme Google Webfonts plugin.
Back to Top
WHAT NOW?
How did you go? Hopefully you’ve now created your own blog and information has helped!
Leave a comment below with a link to your blog and let us all take a look!
Also feel free to leave any questions you are having (or tips/advice) as well.
Or go to Step 2: Set up pages!
just starting with wordpress.. good info thanks for sharing
Thank you to give very useful blog https://www.thedigichamps.com/
Very useful website for teachers and students to explore their knowledge